

If you’re interested in starting to paint with watercolors, you’re in the right place. Learn to paint with watercolor in 12 simple steps.
In this article, we’ll show you some important tips so you can successfully get started with this technique.
To begin, all you need is a little patience, a desire to learn, and perseverance to progress through the process. The most important thing is to enjoy every step of the way, letting your creativity guide you and enjoying the learning process. So let’s get started!
Tabla de contenidos
- 1 What is the watercolor technique? How is it used?
- 2 Learn to paint with watercolor in 12 simple steps
- 3 What is making a color test and how to do it?
- 4 How is the handling of white in watercolor?
- 5 Masking fluid
- 6 What is Arabic Gum?
- 7 How is gum arabic used for painting with watercolor?
- 8 Arabic Gum as a diluting medium
- 9 How to paint watercolor on paper?
- 10 Painting with Watercolor Pans
- 11 Painting with tube watercolors
- 12 Painting on dry and wet surface
- 13 Use of hair dryer in watercolor
- 14 How to remove adhesive tape from watercolor paper?
- 15 The Benzine for cleaning and degreasing
- 16 What is a medium for watercolor? Using mediums for finishing.
What is the watercolor technique? How is it used?
At this point, we will only mention the essential materials you need for watercolor painting. However, if you need additional information about the types of brushes, papers, and watercolors to use, we recommend clicking on the link provided HERE.
There you will find a complete guide to help you choose the right materials according to your needs and preferences.
Materials Guide
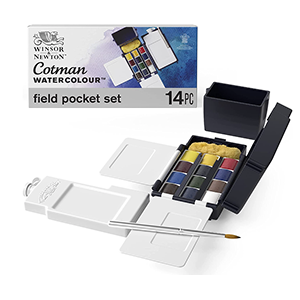
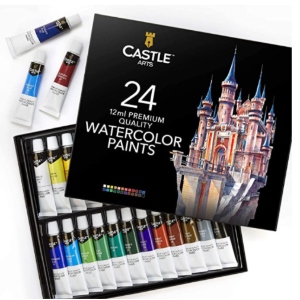
Watercolor Paint Set in Pans or Tubes, Round Brushes, Special Watercolor Paper, Rigid Support or Board to Secure Paper, Masking Tape, Masking Fluid (not essential), Gum Arabic (not essential), Mixing Palette, Water Containers, Absorbent Paper for Drying, Cotton Cloth for Drying, Solvent for Cleaning, and Hair Dryer.
Below is a list of materials that I recommend:


Learn to paint with watercolor in 12 simple steps
Basic Steps You Should Know to Create Great Artworks:
Step 1 – Mediums, Paper, Brushes, and Paint”
The first thing you should know about watercolor painting is that it is water-soluble, making it the primary medium for diluting and mixing colors. In addition to water, Gum Arabic can also be used as a solvent or additive.
To apply the watercolor technique, special watercolor paper and brushes or sponges are used. The choice of the right materials is essential to achieve the desired effects and obtain optimal results.
This technique involves applying layer upon layer of diluted color, creating transparencies that darken as the layers overlap.
Success in watercolor technique lies in controlling the right amount of water used in each paint and mixture layer. But don’t worry, this can be achieved with practice and a good selection of materials.
It is important to choose high-quality papers and paints that allow you to achieve the desired results, and to familiarize yourself with the different effects that can be achieved by varying the amount of water in the mixture.
Remember that experimentation is a fundamental part of learning in watercolor technique.

What is making a color test and how to do it?
Step 2 – Color test
Before starting to work on your artwork, it is recommended to make a small color sample to familiarize yourself with the tones you will obtain when diluting the paint. You can do this by loading the brush with diluted paint and applying it to the paper from the darkest color to the lightest or most transparent tone. Let the sample dry to see the final color result.
It is important to keep in mind that watercolor colors tend to lighten as they dry, so it is necessary to take this into account when selecting and mixing colors.
Most watercolor sets include a special paper marked with small squares to make this color sample. Take advantage of this tool to get the best result in your artwork.

Step 3 – Glazing
To achieve proper technique in watercolor, it is recommended to start with light or transparent layers, using washes that contain a higher amount of water. As layers are added, colors become darker and more intense, creating volumes and defined spaces.
Backgrounds or undefined spaces can be created by applying washes with diluted or blended colors. These washes provide a sense of freshness and freedom to the artwork.

How is the handling of white in watercolor?
Step 4 – White watercolor
In the purist technique of watercolor, white pigment is not usually used because its mixture with other colors can lead to a loss of transparency and a decrease in brightness in the work, transforming it into a gouache. If you wonder how to achieve the effect of white in your work, there are other techniques and resources you can use to obtain a similar effect without compromising the purity of the watercolor technique.
How can I do it? Do I need white in my work?
If you are wondering how to achieve the effect of white in your artwork, the answer lies in the paper, the main protagonist in watercolor technique. To create openings and points of light, you should reserve areas of white paper. In other words, the brighter the light, the fewer layers of color you should apply. To obtain pure white, the paper should remain without layers of color.
Although there is white watercolor paint called Chinese White and Titanium White, it is recommended to experiment with different techniques and materials to achieve the desired effect. Conducting tests and evaluating the results will allow you to discover new ways to achieve white in your artwork.


If you want to learn more about the use of white in watercolor technique, I invite you to visit my blog, where you will find an article that explains in detail how to achieve whites in watercolor. You can access the article by clicking on the following link: click HERE.
I hope you find this information useful for your future watercolor works.

Masking fluid
Step 5 – Protecting areas of the paper
Masking fluid is a very useful tool and can be of great help in achieving white areas in your watercolor painting.
It is a waterproof liquid designed to mask areas of the paper that we do not want to cover with paint. This liquid dries quickly and is easily applied to the areas of the paper that we want to protect. Once we have applied the necessary layers of paint and they have dried, we can easily remove it by gently rubbing it off.


What is Arabic Gum?
Step 6 – Diluting and Additive Medium
Gum Arabic is a natural resin obtained from the Acacia tree. It dissolves easily in water and is used in liquid form as a medium to dilute paint or as an additive.
Furthermore, gum arabic is transparent and slightly viscous, which makes it very interesting to experiment with in your artwork. By using it, you can achieve new effects and textures, and it can become one of your preferred materials.
In summary, gum arabic is an interesting resource in the technique of watercolor, which will allow you to expand your creative possibilities and obtain surprising results in your artwork.


Characteristics
Gum Arabic has a very important characteristic in watercolor technique: it is a retarder, which means it delays the drying of the paint on the paper. When mixed with the paint, the consistency of the mixture becomes thicker, allowing for better control of the dispersion of moisture on the paper. Additionally, gum Arabic increases the transparency and brightness of the paint.
It is essential to know these characteristics when using gum Arabic, as its use can have various effects on the paint. For example, diluting the paint with gum Arabic can achieve the wet-on-wet effect.
It is important to mention that there are several brands and presentations of gum Arabic available for use in watercolor technique. When choosing a brand, it is recommended to verify the quality of the product to ensure a better result in your artwork.
How is gum arabic used for painting with watercolor?
There are several ways to use it, it is very important to test, wait until it dries and see the results, since depending on how you use it, the results will be different. Let’s see:
Arabic Gum as a diluting medium
Medium for diluting
Gum Arabic as a medium for dilution
Gum Arabic can be used pure, adding liquid directly from the bottle onto the palette, adding color and mixing before applying with a brush onto the paper. However, it is important to note that this way of applying Gum Arabic can crack the paint as it dries, so it is recommended to do tests before starting a work.
Gum Arabic as an additive medium
Additive medium
In addition to using Gum Arabic in its pure state, another way to incorporate it into watercolor technique is by adding a few drops to the water container used for mixing paint. This technique can be used in all or some layers, and offers the same characteristics mentioned earlier, although with less intensity than when used in its pure state.
By adding Gum Arabic to the mixing water, better control of the paint dispersion on the paper is achieved and prevents the paint from spreading too much. Additionally, like when using it in its pure state or diluted with water, a retardant effect is achieved, allowing for more time to work the paint.
It is important to mention that the amount of Gum Arabic to be added to the mixing water will depend on the technique and desired result. Therefore, it is recommended to do tests before starting a work to find the appropriate proportion and obtain the best results in your artworks.
How to paint watercolor on paper?
The use of masking tape
Step 7 – Secure the paper to a surface
Before starting to paint with watercolor, it is recommended to fix the paper to a rigid surface, such as a board, to facilitate the application of washes and glazes, and also to better control the paper’s buckling. To achieve this, adhesive paper tape can be used to completely mask the edges of the paper on all four sides.
By masking the edges of the paper, a clean and defined border is created in the final artwork, and the risk of the paint running outside the desired area is avoided. In addition, by fixing the paper to a rigid surface, the possibility of wrinkling or buckling during the painting process is reduced.


Painting with Watercolor Pans
Step 8 – Painting with watercolor pans or godets
To paint with watercolor pans or godets, the first step is to moisten the brush with clean water and run it over the color pan. With light rubbing movements, a little color is picked up and transferred to the palette or the back of the lid where the pans are housed. At this point, the color can be mixed with more water to start applying layers of color on the paper.
It is important to mention that the amount of water to be used will depend on the desired result and the intensity of the color that you want to achieve. It is recommended to do some testing before starting a painting to find the right proportion of water and get the best results in your artwork.
Another recommendation for the watercolor technique with pans is to experiment with applying layers of color over dry and wet layers. By applying layers of color over dry layers, you achieve a greater opacity and definition effect, while by applying layers of color over wet layers, you obtain a lower definition effect and color fusion.
Painting with tube watercolors
Step 9 – Painting with liquid watercolor
To paint with liquid watercolors, the first step is to add paint directly from the tube to the palette. Next, load the brush with water and bring it onto the color, mixing and diluting until the desired consistency is achieved. Once the right mix is obtained, bring the brush onto the paper to begin applying the layers of color.
It is important to regulate the amount of water needed and mix the desired colors beforehand to achieve the best results in the artwork. For this, it is recommended to do previous tests on the palette before applying the watercolor on the paper.
Also, like with the pan technique, it is recommended to experiment with the application of layers of color on dry and wet layers. In this way, different effects and textures can be achieved in the final artwork.
Painting on dry and wet surface
Step 10 – Painting on dry or wet paper
There are two ways to apply color in watercolor: on dry paper or on wet paper. Experimenting with both techniques can offer interesting and unique results.
If you want to experiment with the dry paper technique in watercolor, a good practice is to apply a base layer of color and then continue working on another part of the artwork while it dries naturally. Once the paint layer is dry, you can apply the next layer of color and so on.
An important detail of watercolor is that it’s possible to modify the color even after the paint has dried. To do this, just apply a small amount of water carefully with a brush and dry it with absorbent paper. It’s also possible to scrape the paper when the paint is dry, allowing you to remove layers of color and modify the final effect of the artwork.
If you want to experiment with the wet paper technique in watercolor, you need to wet the paper with a clean brush loaded with water, a sponge, or a spray atomizer.
It’s important to wait a few minutes for the water to unify on the paper. If there is excess water, you can dry it with blotting paper to obtain a suitable working surface. Once ready, start painting with washes using pure or mixed colors, and observe how the pigment behaves on the wet paper. This technique offers greater spontaneity and fluidity in the final artwork. Give it a try!
In watercolor, some colors are granulating and are usually indicated with the letter “G”. These colors can produce very interesting effects in the artwork, such as color edges marked with a higher amount of pigment.

In addition, in watercolor painting, you can combine the technique of painting on wet and dry areas within the same artwork to achieve more complex and textured results.
It is important to keep the water in the container for mixing paint as clean as possible, to avoid dirtying the color. Therefore, a useful recommendation is to keep two containers of water: one for cleaning the brush and the other for diluting and mixing the color. This way, you can work more efficiently and prevent colors from getting contaminated. Keep experimenting and enjoying watercolor painting!
Use of hair dryer in watercolor
Step 11 – Hair dryer for watercolor
Watercolor is a quick-drying technique, but if you want to speed up the process, you can use a hair dryer. This will help you reduce the drying time and continue working on your artwork. To do this, simply apply the desired layer of color and then dry it with the hot air from the hair dryer.
Once the paint is dry, you can apply the next layer of color and so on.
Remember that watercolor is a technique that requires practice and patience, so don’t get discouraged if you don’t achieve the desired result at first! Keep experimenting and enjoying the creative process.
How to remove adhesive tape from watercolor paper?
Step 12 – Removing the Artwork from the Surface
Finally, when you have finished applying all the desired layers of color, let the paper dry completely before removing the adhesive tape. Sometimes, the tape can stick strongly to the paper, but don’t worry, you can use a hair dryer to easily remove it. To do this, apply hot air over the tape for a few seconds and then carefully remove it.
Remember that watercolor is a technique that requires patience and practice, so don’t be discouraged if your first works don’t turn out as you expected. Keep experimenting and exploring the possibilities of this fascinating technique. Enjoy the creative process!
The Benzine for cleaning and degreasing
Step 12 – Use of Benzine in watercolor
If you notice sticky residues on the paper after removing the adhesive tape, you can easily clean them with a little bit of benzine. To do this, apply some benzine on a cotton ball and gently rub it on the stained area until the dirt disappears.
Benzine is a very useful product in the arts, as it evaporates quickly without damaging the paper. In addition to cleaning adhesive tape residues, you can use it to degrease and remove tough stains from other substances. However, it is important to use it with caution and in a well-ventilated area, as inhalation can be harmful to health.
What is a medium for watercolor? Using mediums for finishing.
The watercolor technique has a variety of available mediums that can be used in different ways to achieve special effects in the final finish of the artwork.
Some mediums can be applied to wet or dry paper, mixed with other colors, or used in their pure form. For example, there are mediums that make watercolor waterproof, allowing for unique transparencies, as well as drying retarders that provide glossy finishes.
There are also spray mediums that produce effects such as drips or pearlescent finishes, among others. Each brand offers its own exclusive products for experimenting with this technique.

I hope it has been helpful for you… And best of luck on your journey!
